Business Online Banking and Mobile App Resources Positive Pay

Need Help?
POSITIVE PAY
Positive Pay is a fraud detection tool that matches ACH and/or check transactions presented for payment against previously authorized transactions by your company, to help you prevent fraud before it occurs.
* Positive Pay services are intended for business customers only, and require additional agreements. Positive Pay processing is subject to bank business days: Monday through Friday, excluding federal holidays, and cut-off time requirements. Certain fees and limitations apply. Please contact your local branch to speak to Treasury Sales.
ACCESS Positive Pay
Access Positive Pay by completing the following steps:


ACH POSITIVE PAY
ACH Positive Pay offers additional protection from unauthorized ACH transactions. This online tool provides the ability to monitor and control which ACH transactions (debits and credits) post to your account(s).
ACH transactions sent from authorized ACH companies will go through without the need for review. Any companies that are not on the approved ACH list will be presented as an exception, and must be reviewed by the person who decides if they should be paid or returned.


HELPFUL HINT:

CHECK POSITIVE PAY
Check Positive Pay can help prevent unknown check transactions from hitting your account by allowing you to upload a list of issued checks that the Bank uses to automatically verify checks as they post to your business account. Check transactions that are not on your issued checks list will be available online for you to approve or return.
1. Your business is responsible for uploading or entering your issued checks so that the system can recognize which check items are exceptions. To upload/enter your checks go to Cash Management and Positive Pay. There are three ways to enter/upload your check items. They are: 1) Manual Entry, 2) CSV File and 3) Fixed Position File. Here are the steps for each type:


Save the file as a CSV (Comma delimited) file.


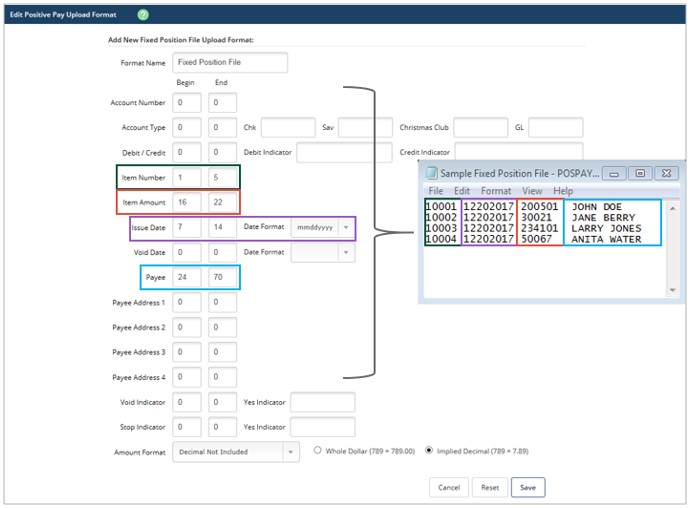
To create your upload format, click Edit Upload Format and choose Fixed Position from the Select Upload Format to Edit drop-down menu. Next to Select Fixed Position Format to Edit, choose Fixed Position Format.

(Example shown below: Item Number = characters 1-5, Item Amount = characters 16-22, Issue Date = characters 7-14, etc.)
When the formatting is correct, Save the Upload Format.


Choose Pay or Return for each exception item, then click Submit.

HELPFUL HINT:
To receive an alert when you have a Check Positive Pay exception, go to Options, Alerts and Events. You may choose to receive the Positive Pay Exceptions alert by email, login or text. Then, Submit.
